一、前提说明:
1、注册一个企业微信
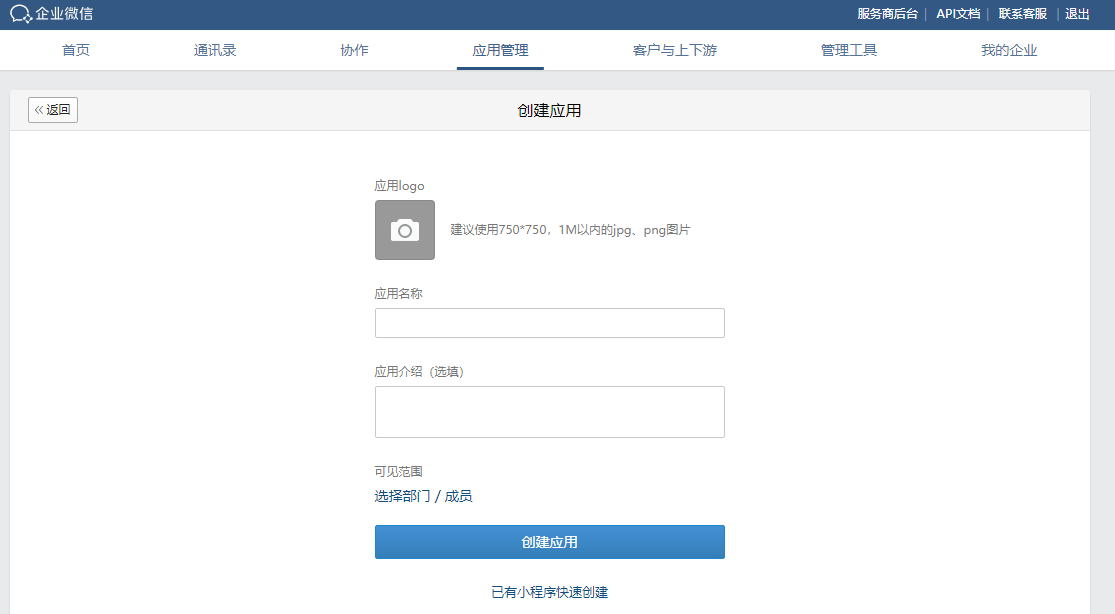
2、在企业微信应用中创建应用
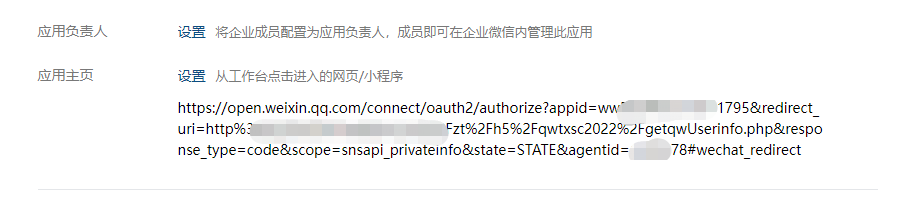
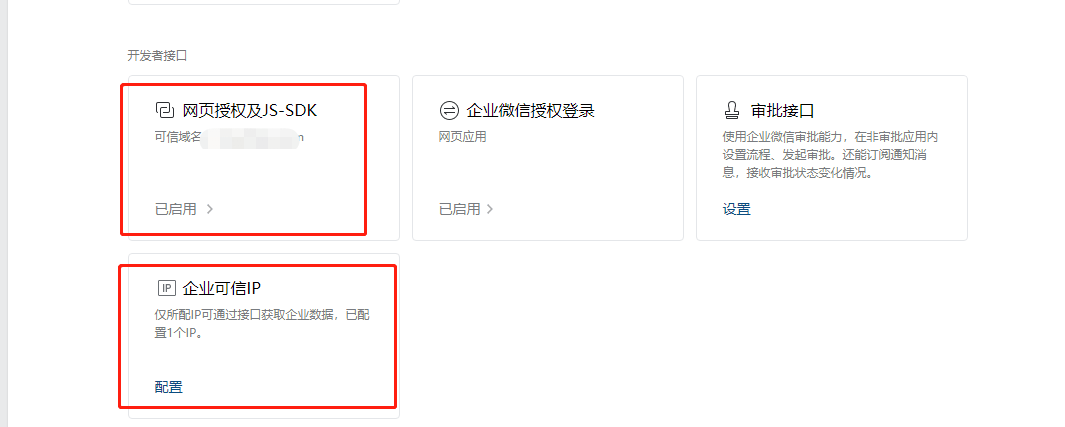
3、设置应用主页、IP白名单、回调域名
二、生成应用主页:这里需要把url地址进行urlencode
<?php
$callUrl = urlencode("http://www.tpxhm.com/h5/qwtxsc2022/getqwUserinfo.php");
echo "https://open.weixin.qq.com/connect/oauth2/authorize?appid=APPID&redirect_uri=$callUrl&response_type=code&scope=snsapi_base&state=STATE&agentid=2011114#wechat_redirect";exit;
?>
scope说明:应用授权作用域
snsapi_base:静默授权,可获取成员的基础信息;
snsapi_userinfo:静默授权,可获取成员的详细信息,但不包含手机、邮箱;
snsapi_privateinfo:手动授权,可获取成员的详细信息,包含手机、邮箱。
创建应用,把生成的URL地址粘贴是应用里面,设置应用IP白名单、回调域名
三、编写授权获取用户头像
<?php
$appid = "wweecxxxaaccsdcx";  //企业信息中的ID
$SECRET = "NHjVLz22bYrxCSGVSACAOHr2hJHj20";  //应用secret
//3.1、获取授权过来的code
$code = $_GET['code'] ? $_GET['code'] : '';
if($code==''){
	echo "参数错误";
}
//3.2、通过code获取access_token
// 获取access_token
$url = "https://qyapi.weixin.qq.com/cgi-bin/gettoken?corpid=".$appid."&corpsecret=".$SECRET;
$result = getJson($url);
?>
3.3、通过code和access_token获取userid和user_ticket
<?php
$access_token = $result['access_token'];
$url2 = "https://qyapi.weixin.qq.com/cgi-bin/auth/getuserinfo?access_token=".$access_token."&code=".$code;
$result2 = getJson($url2);
$useId = $result2['userid'];
$data = [
	"user_ticket"=> $result2['user_ticket']
];
//3.4、通过user_ticket获取成员敏感信息获取头像
$result3 = http_post($url3,json_encode($data ));
if($result2['errcode']!=0){
			echo "授权过期";
      header("Location:https://open.weixin.qq.com/connect/oauth2/authorize?appid=APPID&redirect_uri=http%3A%2F%2Fm.tpxhm.com%2Fzt%2Fh5%2Fqwtxsc2022%2FgetqwUserinfo.php&response_type=code&scope=snsapi_privateinfo&state=STATE&agentid=2021101#wechat_redirect");
		}else{
      $avatar = $result3['avatar'];
      $userid = $result3['userid'];
			$txImg = savePhoto($avatar,$result3['userid']);
      // echo $txImg; exit;
}
function http_post($url, $post_data, $header = [], $proxy = [])
{
  $ch = curl_init();
  curl_setopt($ch, CURLOPT_POST, 1);
  curl_setopt($ch, CURLOPT_HEADER, 0);
  curl_setopt($ch, CURLOPT_URL, $url);
  curl_setopt($ch, CURLOPT_SSL_VERIFYPEER, false);
  curl_setopt($ch, CURLOPT_SSL_VERIFYHOST, false);
  curl_setopt($ch, CURLOPT_RETURNTRANSFER, 1);
  if (!empty($header)) {
    curl_setopt($ch, CURLOPT_HTTPHEADER, $header);
  }
  if (!empty($proxy)) {
    curl_setopt($ch, CURLOPT_PROXYTYPE, CURLPROXY_SOCKS5);
    curl_setopt($ch, CURLOPT_PROXY, "{$proxy['ip']}:{$proxy['port']}");
    curl_setopt($ch, CURLOPT_PROXYUSERPWD, "{$proxy['username']}:{$proxy['password']}");
  }
  curl_setopt($ch, CURLOPT_POSTFIELDS, $post_data);
  $result = curl_exec($ch);
  curl_close($ch);
  return json_decode($result, true);

  // return $result;
}
function getJson($url){
  $ch = curl_init();
  curl_setopt($ch, CURLOPT_URL, $url);
  curl_setopt($ch, CURLOPT_SSL_VERIFYPEER, FALSE);
  curl_setopt($ch, CURLOPT_SSL_VERIFYHOST, FALSE);
  curl_setopt($ch, CURLOPT_RETURNTRANSFER, 1);
  $output = curl_exec($ch);
  curl_close($ch);
  return json_decode($output, true);
}
//3.5、保存用户头像到本地服务器上(解决无法使用canvas生成图片问题)
function savePhoto($url,$fileName){

  set_time_limit(0);//抓取不受时间限制
  $url=str_replace('&','&',$url);
  $curl = curl_init();

  curl_setopt($curl, CURLOPT_URL, $url);
  curl_setopt($curl, CURLOPT_HEADER, false);
  curl_setopt($curl, CURLOPT_USERAGENT, "Mozilla/4.0 (compatible; MSIE 6.0; SeaPort/1.2; Windows NT 5.1; SV1; InfoPath.2)");
  curl_setopt($curl, CURLOPT_RETURNTRANSFER, 1);
  curl_setopt($curl, CURLOPT_FOLLOWLOCATION, 0);

  $values = curl_exec($curl);
  curl_close($curl);

  $fileName = $fileName.'.png';
  $savePath = "/zt/h5/qwtxsc2022/qwtx/";
  $path = $_SERVER['DOCUMENT_ROOT'].$savePath;

  if(!is_dir($path)){
    mkdir($path,'0755',true);
  }
  $fp2 = fopen($path.$fileName,'wb');

  fputs($fp2, $values);
  fclose($fp2);
  return $savePath.$fileName;
}
?>
四、前端使用canvas将图片和图片框生成最终的图片
<!DOCTYPE html>
<html>
<meta charset="utf-8">
<meta content="width=device-width,initial-scale=1.0,maximum-scale=1.0,user-scalable=0" name="viewport">
<head>
  <title>企业微信头像在线生成</title>
  <script src="js/jquery.js"></script>
  <script type="text/javascript">
    function fontSize(){
      var deviceWidth=document.documentElement.clientWidth>750?750:document.documentElement.clientWidth;
      document.documentElement.style.fontSize=(deviceWidth/25)+"px";
    }
    fontSize();
    window.onresize=fontSize;
  </script>
</head>
<style>
body{width: 100%;max-width: 750px;margin: 0px; padding: 0px;width: 100%;text-align: center;font-size: 1.5rem; overflow-x: hidden; background-color: #fff; font-family: '微软雅黑'; }
  .app{ width: 100%;max-width: 750px; height: auto; top: 0; bottom:0; background: #fff; }
  .app img{margin-top: 0.5rem; width: 70%; height: auto;}
  .app p{ font-size: 1.2rem; line-height: 1.8rem;}
  .zdyibtn{display: inline-block; padding: 0.1rem 0.2rem; text-decoration: none; background: #66CCFF;line-height: 1.8rem; color: #fff; font-size: 1rem; margin-left: 0.5rem;}
  .zdy{ width: 94%; margin-left: 3%; line-height:1.8rem; font-size: 1rem; text-align: left;}
</style>
<body>
  <div id="app" class="app">
  </div>
</body>
<script>

let canvas = document.createElement('canvas')
canvas.width = "600"
canvas.height = "600" //创建画布,并设置宽高
//注意canvas元素本身并没有绘制能力(它仅仅是图形的容器
//getContext()方法可返回一个对象,该对象提供了用于在画布上绘图的方法和属性
let ctx = canvas.getContext("2d")
ctx.rect(0,0, 600, 600) //矩形坐标,大小 (距离左上角x坐标,距离左上角y坐标,宽度,高度)
ctx.fillStyle = "#fff" //矩形的颜色
ctx.fill() //填充
function loadImg(src) {
  let paths = Array.isArray(src) ? src : [src]
  let promise = paths.map((path) => {
    return new Promise((resolve, reject) => {
      let img = new Image()
      img.setAttribute("crossOrigin", 'anonymous')
      img.src = path
      //只是更新了DOM对象,图片数据信息还未加载完成,加载资源是异步执行的,需要监听load事件的,事件发生后,就能获取资源
      img.onload = () => {
        resolve(img)
      }
      img.onerror = (err) => {
        alert('图片加载失败')
      }
    })
   })
   return Promise.all(promise)
}
function ShowTheObject(obj){
  var des = "";
  for(var name in obj){
    des += name + ":" + obj[name] + ";";
  }
  return des;
}
let wx_img = '<?php echo $txImg; ?>';
// wx_img = wx_img.substr(0, wx_img.length - 2);
loadImg([
  wx_img,
  './icon_20220903.png?<?php echo time(); ?>',
]).then(([img1, img2])=> {
  ctx.drawImage(img1, 0, 0, 600, 600) //画布上先绘制人物图`
  ctx.drawImage(img2, 0, 0, 600, 600) //再绘制二维码图,根据设计图设置好坐标。`
  imageURL = canvas.toDataURL("image/png") //获取图片合并后的data-URL,参数可选图片格式,图片质量,详自查API`
  let img3 = new Image()
  document.getElementsByClassName("app")[0].append(img3)
  img3.src = imageURL
  canvas.style.display = "none"
});
</script>
</html>
五、 文章末尾探讨:因为企业微信授权获取的头像,直接用获取到的URL作为图片路径,生成图片一致报错,提示图片加载失败,所以这里博主,采用的思路是存到本地服务器上,名称为成员userid名字,再次返回图片路径,欢迎一下评论留下你更好的解决方法。


 关于简忆
关于简忆 简忆诞生的故事


 粤ICP备16092285号
文章评论(0)